
Auto-Ban Malicious IPs on Cloudflare with Laravel
If you're running a Laravel site behind Cloudflare, you've probably noticed something frustrating in your logs: waves of 404 errors from bots probing for WordPress vulnerabilities, React vulnerabilities, or other various paths. Requests to /wp-admin, /wp-login.php, /wp-includes - even though you're not running WordPress or React.
Cloudflare's WAF rules can block these requests, but here's the catch: WAF rules are path-specific, not blanket blocks. When a rule triggers on /wp-admin, it blocks that specific path while the same visitor can still access /, /about, or any other page. The bot gets a 403 on the WordPress path, shrugs, and continues probing other URLs.
The result? Your analytics can fill with 404 errors from the same malicious IPs, skewing your analytics and making it harder to spot real issues. Your server still processes these requests, wasting resources, and you consume Nightwatch credits or other monitoring tools that mark these requests as failures.
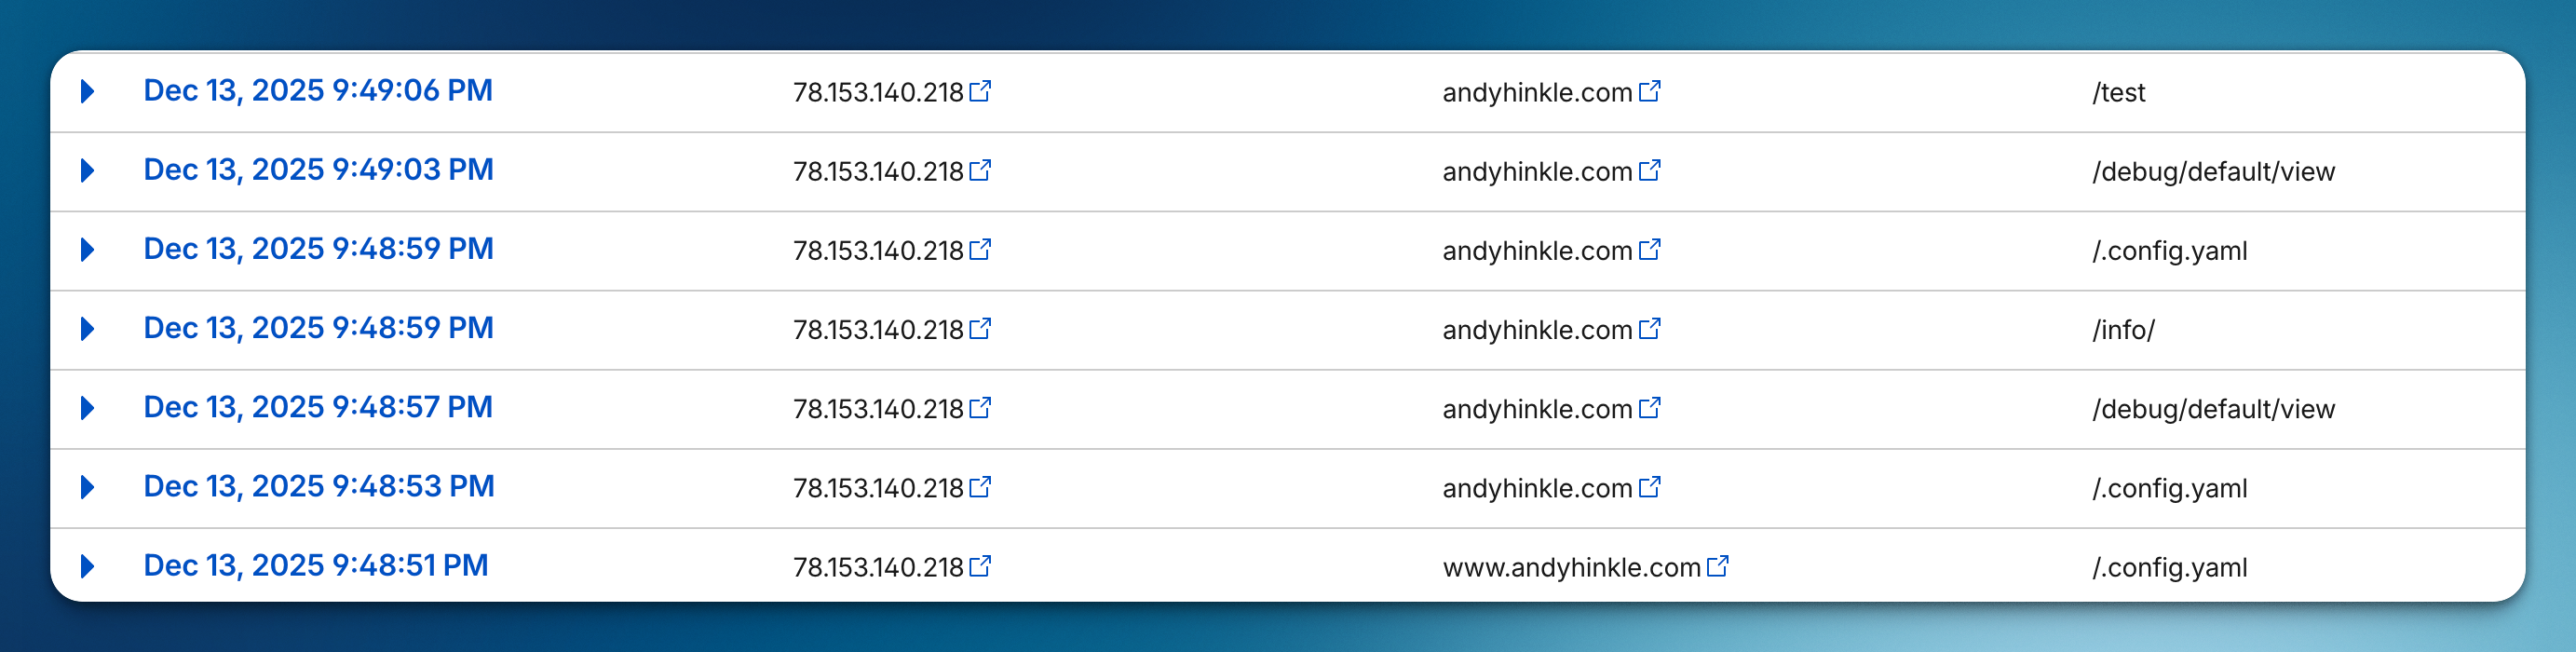
Cloudflare offers IP blocking, but manually banning IPs is tedious and reactive. You can view a sample of traffic by visiting Security → Analytics in Cloudflare, but this only shows a fraction of the traffic and requires manual intervention. Here's an example of one such IP repeatedly hitting various non-existent paths:
Let's fix that by automatically banning IPs at the Cloudflare level when they exhibit malicious behavior.
The Strategy
We'll build a Laravel middleware that:
- Immediately bans any IP requesting WordPress-related paths
- Tracks 404 errors per IP address using Laravel's cache
- Auto-bans any IP that triggers 5+ 404s within 120 seconds
- Updates Cloudflare's WAF via a queued job to add the IP to a block rule
The beauty of this approach is that once an IP is banned at Cloudflare's edge, they never even reach your server again.
Step 1: Set Up Cloudflare
First, you'll need a WAF Custom Rule in Cloudflare to hold your banned IPs.
- Go to your Cloudflare dashboard → Security → WAF → Custom Rules
- Create a new rule with these settings:
- Rule name: IP Ban
- Expression:
(ip.src eq 0.0.0.0)(we'll update this dynamically) - Action: Block
- Note the Zone ID, Ruleset ID, and Rule ID from the URL and API
Create an API Token with Zone → Zone WAF → Read and Zone → Zone WAF → Edit permissions.
Add these to your .env:
1CLOUDFLARE_ZONE=your-zone-id2CLOUDFLARE_RULESET=your-ruleset-id3CLOUDFLARE_RULE=your-rule-id4CLOUDFLARE_TOKEN=your-api-tokenAnd register them in config/services.php:
1'cloudflare' => [2 'zone_id' => env('CLOUDFLARE_ZONE'),3 'ruleset_id' => env('CLOUDFLARE_RULESET'),4 'rule_id' => env('CLOUDFLARE_RULE'),5 'token' => env('CLOUDFLARE_TOKEN'),6],Step 2: Create the Ban Job
This queued job handles the Cloudflare API interaction. It fetches the current rule, appends the new IP to the expression, and updates the rule.
1php artisan make:job BanIpOnCloudflare 1<?php 2 3namespace App\Jobs; 4 5use Illuminate\Contracts\Queue\ShouldQueue; 6use Illuminate\Foundation\Queue\Queueable; 7use Illuminate\Support\Facades\Config; 8use Illuminate\Support\Facades\Http; 9use Illuminate\Support\Facades\Log;10 11class BanIpOnCloudflare implements ShouldQueue12{13 use Queueable;14 15 public function __construct(16 public string $ip,17 public string $reason,18 ) {}19 20 public function handle(): void21 {22 $expression = $this->fetchCurrentExpression();23 24 $updatedExpression = "{$expression} or (ip.src eq {$this->ip})";25 26 $this->updateRule($updatedExpression);27 28 Log::info("Banned IP {$this->ip} on Cloudflare", [29 'ip' => $this->ip,30 'reason' => $this->reason,31 ]);32 }33 34 private function fetchCurrentExpression(): string35 {36 $response = Http::withToken($this->token())37 ->throw()38 ->get($this->rulesetUrl());39 40 $rules = $response->json('result.rules', []);41 42 foreach ($rules as $rule) {43 if ($rule['id'] === $this->ruleId()) {44 return $rule['expression'];45 }46 }47 48 return '(ip.src eq 0.0.0.0)';49 }50 51 private function updateRule(string $expression): void52 {53 Http::withToken($this->token())54 ->patch($this->ruleUrl(), [55 'action' => 'block',56 'description' => 'IP Ban',57 'enabled' => true,58 'expression' => $expression,59 ])60 ->throw();61 }62 63 private function rulesetUrl(): string64 {65 $zoneId = Config::string('services.cloudflare.zone_id');66 $rulesetId = Config::string('services.cloudflare.ruleset_id');67 68 return "https://api.cloudflare.com/client/v4/zones/{$zoneId}/rulesets/{$rulesetId}";69 }70 71 private function ruleUrl(): string72 {73 return "{$this->rulesetUrl()}/rules/{$this->ruleId()}";74 }75 76 private function ruleId(): string77 {78 return Config::string('services.cloudflare.rule_id');79 }80 81 private function token(): string82 {83 return Config::string('services.cloudflare.token');84 }85}The expression format Cloudflare uses is (ip.src eq X) or (ip.src eq Y). We simply append new IPs to the existing expression.
Step 3: Create the Middleware
Now for the middleware that detects malicious behavior and dispatches the ban job.
1php artisan make:middleware BanMaliciousIpMiddleware 1<?php 2 3namespace App\Http\Middleware; 4 5use App\Jobs\BanIpOnCloudflare; 6use Closure; 7use Illuminate\Http\Request; 8use Illuminate\Support\Facades\App; 9use Illuminate\Support\Facades\Cache;10use Symfony\Component\HttpFoundation\Response;11 12class BanMaliciousIpMiddleware13{14 private const int MAX_404_COUNT = 5;15 16 private const int WINDOW_SECONDS = 120;17 18 /**19 * @param Closure(Request): Response $next20 */21 public function handle(Request $request, Closure $next): Response22 {23 if (! App::isProduction()) {24 return $next($request);25 }26 27 if ($this->isWordPressProbe($request)) {28 $this->banIp((string) $request->ip(), 'WordPress probe detected');29 30 abort(403);31 }32 33 $response = $next($request);34 35 if ($response->isNotFound()) {36 $this->trackNotFound($request);37 }38 39 return $response;40 }41 42 private function isWordPressProbe(Request $request): bool43 {44 return collect(['wp-admin', 'wp-login', 'wp-includes'])45 ->contains(fn (string $probe) => str_contains($request->path(), $probe));46 }47 48 private function trackNotFound(Request $request): void49 {50 $ip = (string) $request->ip();51 $key = "ip_404_count:{$ip}";52 53 $count = Cache::increment($key);54 55 if ($count === 1) {56 Cache::put($key, 1, self::WINDOW_SECONDS);57 }58 59 if ($count >= self::MAX_404_COUNT) {60 $this->banIp($ip, "Exceeded 404 threshold ({$count} in ".self::WINDOW_SECONDS.' seconds)');61 62 Cache::forget($key);63 }64 }65 66 private function banIp(string $ip, string $reason): void67 {68 BanIpOnCloudflare::dispatch($ip, $reason);69 }70}Let's break down what this does:
- Production only - We skip all tracking in local/staging to avoid accidentally banning ourselves
- WordPress probes - Immediate ban and 403 response for any request containing
wp-admin,wp-login, orwp-includes - 404 tracking - We increment a counter in cache for each IP that triggers a 404, a strong indication of probing behavior when done repeatedly
- Threshold ban - If an IP hits 5+ 404s within 120 seconds, we ban them
Step 4: Register the Middleware
Add the middleware to your bootstrap/app.php:
1use App\Http\Middleware\BanMaliciousIpMiddleware;2 3return Application::configure(basePath: dirname(__DIR__))4 ->withMiddleware(function (Middleware $middleware) {5 $middleware->append([6 BanMaliciousIpMiddleware::class,7 ]);8 })9 // ...The Result
Now when a malicious bot hits your site:
- If they request
/wp-admin→ Immediate 403 + banned on Cloudflare - If they probe random URLs and trigger 5+ 404s → Banned on Cloudflare
- All subsequent requests from that IP are blocked at Cloudflare's edge
Your logs stay clean. Your analytics stay accurate. And the bots never reach your server again.
Tuning the Thresholds
The default settings (5 404s in 120 seconds) work well for most sites, but you should customize this for what makes sense in your application. Beyond 404s, you could also track things like:
- 403 errors - Too many forbidden requests could indicate someone probing for access
- Failed authentication attempts - Repeated login failures from the same IP
- Rate limit violations - IPs that consistently hit your rate limits
Here are some other adjustments to consider:e
- High-traffic sites: Consider raising the threshold to 10+ to avoid false positives
- First or fail endpoints: You might want to exclude certain paths from 404 tracking, especially if they are soft-deleted or frequently changing
- Legitimate crawlers: Consider whitelisting known good bots by user agent
You could also extend the WordPress probe detection to include other common attack vectors like .env, phpinfo.php, or .git/config.
Resources
Looking to get started with Cloudflare caching? Check out my other post on Using Cloudflare Page Cache with Laravel.